Your own free PaaS with Dokku and Let's Encrypt


I've been working with Platform as a Service products for almost 3 years. I truly believe that an introduction of PaaS solutions was a breakthrough for web development.
There are many online services that provide an efficient and relatively cheap entry-level PaaS (e.g. Heroku, EngineYard), but what about self-hosted alternatives? Do they exist? Are they a good call?
Yes, there are production ready platforms (e.g. Deis Workflow, or Flynn), but it depends on when it will pay off to use them. The tools that we use and create to manage one of our platform products were already described by Maciej Małecki on our blog. You may just deduce from it, how much work it would take to ship such solution from scratch. Eventually, it was a good call, for a big, multitenant project it covers. But what about smaller use cases?
I was wondering if there is such minimal stack that provides a real PaaS experience for personal or development usage and it looks like I found one.
In this post, I’ll show you how to build a self-hosted PaaS to host web applications in almost any modern technology (inc. Ruby, Node.js, Go and more) in around 15 minutes.
What do we want?
Our goal is a platform that automates the process of deployment and publishing of an application. It should manage a database on a single server. Just like with all the modern PaaS solutions, we would like to use git push to deploy our code. Also, we would like to use Let’s Encrypt to have a valid certificate for our application.
Ingredients
- A fresh machine with a public IP address running on Ubuntu (14.04/16.04) LTS x64 with at least 1GB of memory (e.g. AWS free tier -
t2.microinstance). - A domain with access to DNS settings - optional for Dokku, but required to request a certificate from Let’s Encrypt.
Dokku
Dokku is called the smallest PaaS implementation you’ve ever seen. It’s an extensible, open source Platform as a Service that runs on a single server.
Back in the days (~2-3 years ago) it had around of 100 lines of Bash code. It uses the power of Heroku Buildpacks and a the Docker container engine. Over the years it gained a lot of plugins that provides additional services (e.g. databases).
Let’s Encrypt
Let's Encrypt is a free, automated and open Certificate Authority. Service is provided by Internet Security Research Group (ISRG). They want to make the internet more secure and privacy-respecting place. Let’s Encrypt provides digital certificates in order to enable HTTPS (SSL/TLS) for free, in the user-friendly and automated process.
Let’s blend it
Configure DNS records
To properly resolve your application's virtualhost naming, you need to add a wildcard A record that will resolve any subdomain to your machine’s public IP address. Configuration is similar for all DNS providers. The example below is based on Namecheap > Advanced DNS configuration:
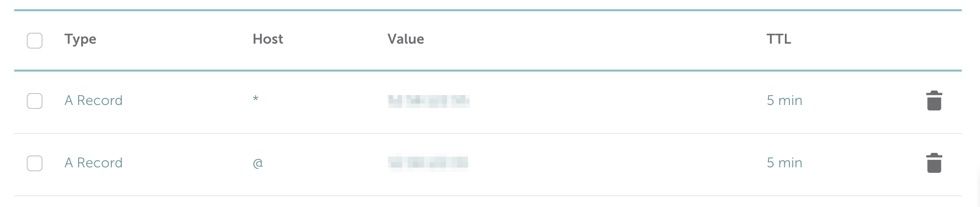
Where @ means your domain name (e.g. example.com), and * is a wildcard for any subdomain (e.g. blog.example.com). As a value, use the public IP address of your machine.
Install Dokku
At the day this blog post was published the stable version of Dokku was v0.8.2. You should check the https://github.com/dokku/dokku/releases page for the current release.
Dokku is designed for usage on a fresh machine and should install all necessary dependencies itself upon the bootstrap process. You can download a bootstrap script and run the installation using the following command on your remote machine:
$ wget https://raw.githubusercontent.com/dokku/dokku/<current-dokku-version>/bootstrap.sh;
$ sudo DOKKU_TAG=<current-dokku-version> bash bootstrap.sh
The installation process takes a while, depending on the CPU and network connection of the machine. After that, you should be able to use a dokku command on your remote machine.
$ dokku version
0.8.2
Alternatively, if you are not a fan of bootstrap scripts, you can use an official .deb repository guide to install Dokku.
Setup Dokku
The next step is to configure your Dokku installation. Open your favorite browser and navigate to machine’s hostname:

On this site, setup your SSH key (used for git push) and virtualhost settings. Enter your hostname in Hostname field, and check the Use virtualhost naming for apps feature. Remember to save your settings by pressing the Finish Setup button.
At this moment, you already have a running Dokku platform (yay!), where you are able to create, and deploy applications.
Besides, you can now run commands remotely over SSH for your Dokku server. To simplify further usage, use an alias on your local workstation:
$ alias dokku='ssh -t dokku@<your-machine-hostname>`
$ dokku version
0.8.0
The -t flag is used to request a PTY, which makes possible to attach to your app’s containers terminal via dokku enter <app-name> command.
Protip: You can store aliases in your ~/.bash_profile file to make it permanent.
Install Plugins
You have a working platform, but we still need a database and Let’s Encrypt support. We’ll use an additional Dokku plugins for that:
- https://github.com/dokku/dokku-postgres.git - creates and manages databases on Dokku server using existing Docker environment.
- https://github.com/dokku/dokku-letsencrypt.git - automatically request and install TLS/SSL certificates from Let’s Encrypt CA.
To install those plugins use following commands on Dokku machine.
$ sudo dokku plugin:install https://github.com/dokku/dokku-postgres.git
$ sudo dokku plugin:install https://github.com/dokku/dokku-letsencrypt.git
Deploying an application
Prepare the code
We will use the Rails sample application provided by Heroku, but feel free to use your own Ruby based application:
$ git clone git@github.com:heroku/ruby-rails-sample.git
$ cd ruby-rails-sample
Create an application
Use the following command to create an application on Dokku:
$ dokku apps:create ruby-rails-sample
Creating ruby-rails-sample... done
The subdomain for your application will be inherited from the application name (e.g. ruby-rails-sample.example.com), so adjust it to your own needs. You can add additional domains/subdomains after creation but this main name can’t be changed later.
Use the following command to list all existing applications:
$ dokku apps
=====> My Apps
ruby-rails-sample
Create a database
Create a new PostgreSQL database on Dokku using dokku-postgres plugin:
$ dokku postgres:create rails-database
...
=====> Postgres container created: rails-database
=====> Container Information
       Config dir:          /var/lib/dokku/services/postgres/rails-database/config
       Data dir:            /var/lib/dokku/services/postgres/rails-database/data
       Dsn:                 postgres://postgres:[generated-secret]@dokku-postgres-rails-database:5432/rails_database
       Exposed ports:       -
       Id:                  8fb232073d50ae3f52de8a01a59f6761fad5506070322a686d9d5372a49ce235
       Internal ip:         172.17.0.4
       Links:               -
       Service root:        /var/lib/dokku/services/postgres/rails-database
       Status:              running
       Version:             postgres:9.6.1
Link the database to your application:
$ dokku postgres:link rails-database ruby-rails-sample
no config vars for sample
-----> Setting config vars
       DATABASE_URL: postgres://postgres:[generated-secret]@dokku-postgres-rails-database:5432/rails_database
-----> Restarting app sample
App sample has not been deployed
Push it
Add a remote to your local repository:
$ git remote add dokku dokku@<dokku-server-hostname>:ruby-rails-sample
Finally, push your code to your Dokku server:
$ git push dokku master
Counting objects: 236, done.
Delta compression using up to 4 threads.
Compressing objects: 100% (135/135), done.
Writing objects: 100% (236/236), 41.85 KiB | 0 bytes/s, done.
Total 236 (delta 85), reused 236 (delta 85)
-----> Cleaning up...
-----> Building sample from herokuish...
-----> Adding BUILD_ENV to build environment...
-----> Ruby app detected
-----> Compiling Ruby/Rails
-----> Using Ruby version: ruby-2.2.1
-----> Installing dependencies using bundler 1.11.2
       Running: bundle install --without development:test --path vendor/bundle --binstubs vendor/bundle/bin -j4 --deployment
       Fetching gem metadata from https://rubygems.org/...........
       Fetching version metadata from https://rubygems.org/...
       Fetching dependency metadata from https://rubygems.org/..
       Using rake 10.4.2
       Installing i18n 0.7.0
       Installing minitest 5.5.1
       Installing json 1.8.2 with native extensions
       Installing builder 3.2.2
       Installing thread_safe 0.3.5
       Installing mini_portile 0.6.2
       Installing erubis 2.7.0
       Installing rack 1.6.0
       Installing mime-types 2.4.3
       Installing arel 6.0.0
       Installing coffee-script-source 1.9.1
       Installing execjs 2.5.2
       Installing hike 1.2.3
       Installing thor 0.19.1
       Installing multi_json 1.11.0
       Using bundler 1.11.2
       Installing tilt 1.4.1
       Installing pg 0.18.1 with native extensions
       Installing rails_serve_static_assets 0.0.4
       Installing rails_stdout_logging 0.0.3
       Using rdoc 4.2.0
       Installing sass 3.4.13
       Installing tzinfo 1.2.2
       Installing nokogiri 1.6.6.2 with native extensions
       Installing rack-test 0.6.3
       Installing puma 2.11.1 with native extensions
       Installing mail 2.6.3
       Installing coffee-script 2.4.1
       Installing sprockets 2.12.3
       Installing rails_12factor 0.0.3
       Installing activesupport 4.2.1
       Installing sdoc 0.4.1
       Installing uglifier 2.7.1
       Installing rails-deprecated_sanitizer 1.0.3
       Installing globalid 0.3.5
       Installing activemodel 4.2.1
       Installing jbuilder 2.2.12
       Installing activejob 4.2.1
       Installing activerecord 4.2.1
       Installing rails-dom-testing 1.0.6
       Installing loofah 2.0.1
       Installing rails-html-sanitizer 1.0.2
       Installing actionview 4.2.1
       Installing actionpack 4.2.1
       Installing actionmailer 4.2.1
       Installing railties 4.2.1
       Installing sprockets-rails 2.2.4
       Installing coffee-rails 4.1.0
       Installing sass-rails 5.0.3
       Installing jquery-rails 4.0.3
       Installing rails 4.2.1
       Installing turbolinks 2.5.3
       Bundle complete! 13 Gemfile dependencies, 53 gems now installed.
       Gems in the group's development and test were not installed.
       Bundled gems are installed into ./vendor/bundle.
       Bundle completed (27.08s)
       Cleaning up the bundler cache.
-----> Preparing app for Rails asset pipeline
       Running: rake assets:precompile
       I, [2017-02-17T15:36:53.928771 #1033]  INFO -- : Writing /tmp/build/public/assets/application-47fe71a3b34a93e1929c175b1755d405.js
       I, [2017-02-17T15:36:53.948369 #1033]  INFO -- : Writing /tmp/build/public/assets/application-c06dd6a542ea15147e6794e03643f87c.css
       Asset precompilation completed (4.42s)
       Cleaning assets
       Running: rake assets:clean

-----> Discovering process types
       Procfile declares types -> web
-----> Releasing sample (dokku/sample:latest)...
-----> Deploying sample (dokku/sample:latest)...
-----> Attempting to run scripts.dokku.predeploy from app.json (if defined)
-----> App Procfile file found (/home/dokku/sample/DOKKU_PROCFILE)
-----> DOKKU_SCALE file not found in app image. Generating one based on Procfile...
-----> New DOKKU_SCALE file generated
=====> web=1
-----> Attempting pre-flight checks
       For more efficient zero downtime deployments, create a file CHECKS.
       See http://dokku.viewdocs.io/dokku/deployment/zero-downtime-deploys/ for examples
       CHECKS file not found in container: Running simple container check...
-----> Waiting for 10 seconds ...
-----> Default container check successful!
-----> Running post-deploy
-----> Attempting to run scripts.dokku.postdeploy from app.json (if defined)
=====> renaming container (d7089963847a) adoring_kirch to sample.web.1
-----> Creating new /home/dokku/sample/VHOST...
-----> Setting config vars
       DOKKU_NGINX_PORT: 80
-----> Setting config vars
       DOKKU_PROXY_PORT_MAP: http:80:5000
-----> Configuring ruby-rails-sample.<your-domain>...(using built-in template)
-----> Creating http nginx.conf
-----> Running nginx-pre-reload
       Reloading nginx
-----> Setting config vars
       DOKKU_APP_RESTORE: 1
=====> Application deployed:
       http://ruby-rails-sample.<your-domain>
And.. that's it! You can now navigate to http://ruby-rails-sample.<your-domain> and see your awesome web application, ready to serve.
What happened?
After you pushed your code, the certain after push git-hook triggered a script that identifies your application as a Ruby application and decided which buildpack to choose. A proper buildpack was downloaded and it built a Docker image with your application and all dependencies (install gems, compiled assets etc.). When the image was ready, Dokku parsed application’s Procfile and found a web process (default process). Then, it scaled your application to one process which, in fact, just mean that one container of your application was started on the server. After your application booted up, Dokku configured Nginx to proxy the application's subdomain to that container.
You can use the following command to check which processes (all applications) are running on your Dokku server:
$ dokku ls
-----> App Name           Container Type            Container Id              Status
ruby-rails-sample          web                           31eb5d37e42a
Let’s encrypt it.
Your application is up, but we still want a TLS/SSL encryption. After you installed the dokku-letsencrypt plugin, you have following options to proceed:
$ dokku letsencrypt:help
    letsencrypt <app>                       Enable or renew letsencrypt certificate for app
    letsencrypt:auto-renew                  Auto-renew all apps secured by letsencrypt if renewal is necessary
    letsencrypt:auto-renew <app>            Auto-renew app if renewal is necessary
    letsencrypt:cleanup <app>               Cleanup stale certificates and configurations
    letsencrypt:cron-job <--add|--remove>   Add or remove an auto-renewal cronjob
    letsencrypt:ls                          List letsencrypt-secured apps with certificate expiry
    letsencrypt:revoke <app>                Revoke letsencrypt certificate for app
First, you need to set an e-mail to register for a certificate on Let’s Encrypt.
$ dokku config:set --no-restart ruby-rails-sample DOKKU_LETSENCRYPT_EMAIL=your@email.tld
The --no-restart flag means that we do not want to restart the application after adding new config entry.
Request a certificate running the following command:
$ dokku letsencrypt ruby-rails-sample
=====> Let's Encrypt ruby-rails-sample...
-----> Updating letsencrypt docker image...
latest: Pulling from dokkupaas/letsencrypt-simp_le

Digest: sha256:20f2a619795c1a3252db6508f77d6d3648ad5b336e67caaf801126367dbdfa22
Status: Image is up to date for dokkupaas/letsencrypt-simp_le:latest
       done
-----> Enabling ACME proxy for ruby-rails-sample...
-----> Getting letsencrypt certificate for ruby-rails-sample...
        - Domain ‘ruby-rails-sample.example.com'

...

-----> Certificate retrieved successfully.
-----> Symlinking let's encrypt certificates
-----> Configuring SSL for ruby-rails-sample.example.com...(using /var/lib/dokku/plugins/available/nginx-vhosts/templates/nginx.ssl.conf.template)
-----> Creating https nginx.conf
-----> Running nginx-pre-reload
       Reloading nginx
-----> Disabling ACME proxy for ruby-rails-sample...
       done
Congratulation, you can now use HTTPS to navigate to your website!
Want more?
- Deploy more applications and services - Dokku supports of deploying applications via Heroku buildpacks with Herokuish, or using a project's dockerfile. Also, you can use a
Procfileto specify additional services within a single application (like Sidekiq, Clockwork etc.). - Schedule periodical database backups using dokku-postgres plugin builtin backup commands (requires S3-compatible storage - eg. free-tier of AWS S3).
- Install more plugins to support different databases and additional services.
- Configure more domains to use with your Dokku server and support multiple projects.
- Hide behind a CDN to increase performance of serving static content and increase its availability (e.g free plan of Cloudflare, or free-tier of AWS CloudFront).
- Scale your applications vertically using
ps:scalecommand. It would spawn more processes which better utilize your remaining machine resources. - If you have multiple processes (containers) of one application, you can configure zero downtime deployments.
Summary
There are more and more features that Dokku may provide you. Unfortunately, Dokku is not a perfect solution. First, all applications containers, no matter how much you scale them, they're still running on a single node. This is a huge vulnerability that may put your whole stack down on the single service or hardware failure. Also, the databases and additional services created by the plugins are sharing the same resources with your applications, which in some cases my decrease performance of the whole stack.
This and more issues may be resolved by use of some more complicated solutions that I mention before, but they would definitely require more hardware resources and probably even more DevOps manpower to ship it.
Anyway, I still believe that Dokku is just enough for small or internal projects (e.g. blog, staging applications) where High Availability is not that important. And at last, for everyone (just like me) who want to peek under the hood of a complete PaaS solution, just for themselves.
TL;DR;
# on remote machine
$ wget https://raw.githubusercontent.com/dokku/dokku/v0.8.0/bootstrap.sh;
$ sudo DOKKU_TAG=v0.8.0 bash bootstrap.sh
$ sudo dokku plugin:install https://github.com/dokku/dokku-postgres.git
$ sudo dokku plugin:install https://github.com/dokku/dokku-letsencrypt.git

# on local workstation
$ alias dokku='ssh -t dokku@<remote-machine>'
$ dokku apps:create ruby-rails-sample
$ dokku postgres:create rails-database
$ dokku postgres:link rails-database ruby-rails-sample
$ git remote add dokku dokku@<remote-machine>:ruby-rails-sample
$ git push dokku master
$ dokku config:set --no-restart ruby-rails-sample DOKKU_LETSENCRYPT_EMAIL=me@example.com
$ dokku letsencrypt ruby-rails-sample

# Go to the website and be happy.